

Convoy Type S2+ 365nm Flashlight Torch Review, The Most Significant Innovation in UV Mineral Lights
- Mark Cole
- Feb 7, 2015
- 13 min read
Updated: Oct 1, 2020

This post was made over four years ago. Since that time it has become outdated. There is a new light - the Convoy FyrFly which is significantly brighter and a major next-generation of an already excellent light. Technology moves on; I hope to do a review on it at some point. (Mini review done: FyRFly - The Convoy Reimagined.
Until recently, the only LW lights collectors had to use (effectively) in the field were complicated and expensive battery powered fluorescent UV lights. Folks tried using the myriad array of cheap 390nm/395nm LED flashlights (often falsely advertised as 365nm), or similarly poor 4W/6W fluorescent blacklight toys, but were quickly disappointed by the low power (in spite of claims to the contrary) and overwhelming blue/purple light from these low-end products. This light is different.
Convoy S2+ 365nm Longwave Mineral Light
Links for the various components, the flashlight, etc. will be provided at the end of this blog article - Techy details, instructions to clean/replace the UV filter - scroll down.
Prices when this review was written were originally around $22 to $25 for the Convoy s2+. At that price it is an amazing performer. But the price has recently (2018) been artificially driven higher by domestic (USA) pressures; one China distributor has stopped shipping to the US altogether. But there are still several companies in China (Fasttech, Aliexpress, Banggood) offering filtered lights in the $20 to $30 price range. It uses a Nichia NCSU276A 365nm LED - one of the best, high-power UV LEDs on the market (2015). The LED is driven hard at 700ma for 3 watts of total power (500ma is the recommended drive current). It has a radiant UV output of around 1000mw (more/less depending on tolerances- driven @700ma, 25% overdriven), all emanating from a pinpoint light source. (A datasheet on this LED can be found here: https://www.nichia.co.jp/specification/products/led/NCSU276A-E.pdf).
Update: Three years after I made this blog post there have been dozens of copycat flashlights introduced to the market. Many claim "new and improved, higher power, 5 watts, etc.". Caveat emptor - this little flashlight and all like it are around 3 watts no matter what others claim - read all about it in this latest GlowNotes post.
Note: a few years after this writing (now 2018) new versions/competitors of the Convoy have been released with even higher power LEDs - some advertising up to 5/6 watts. This little flashlight is already on the edge when it comes to heat; consideration must be given to heat (see section below). A couple of new entrants from Jaxman include the following:
JAXMAN U1c focus spot 6W Nichia UV LED LAMPS 365nm - $63.00 for a kit including battery and charger, filter
JAXMAN U1 365nm 3W UV LED flashlight - $26, filtered (Convoy copycat)
NOTE: PRICE GOUGING! Price on these lights have been raised to over $100 in many cases - simply not worth the price, no better than the half-dozen or so other Convoy knock-offs. (as of mid-April, 2019)
Update #2: A new, significantly more powerful light has been introduced. Worth every penny if you're looking for a powerful, superb design with accurate power specifications: https://www.engeniousdesigns.com/product-page/fyrfly Simply the most powerful light in its category money can buy.
Using a single 18650 battery they provide hours of use on a single charge. The reflector focuses the UV output to an intense, but smooth "spot" and has a range of 10 meters or more, lighting specimens handily quite far away. The intensity of the beam even lights up rocks in daylight or under dealer lighting at shows. The dimensions are 118mm x 24.1mm, and it weighs 90 grams w/o the battery.
The Convoy S2 is available with and without a UV bandpass filter. All UV LEDs emit visible light, some more than others. The Nichia LED is known for being among the lowest offenders, having very little visible light output - but it's still quite noticeable. It is this visible light leakage that causes pictures of minerals to all have that terrible blue cast overwhelming most of the fluorescence when a cheapie light is used (or even a fluorescent BLB (blacklight). For use with fluorescent minerals a filter is an absolute must (this author's opinion).
Viewing minerals with this flashlight is a treat - it activates fluorescence in minerals not thought to be LW fluorescent. But without a filter the colors can appear washed out, or worse, a dimmer fluorescence might not even be noticed. A ZWB2 filter is an inexpensive piece of colored glass which performs as a longwave bandpass filter and is perfect for our application. Transmission specs for the ZWB filter line can be found on our Technical Specs page. As of 2018 several folks, both USA and China, sell assembled lights with filters, some even offer batteries and chargers in a kit. But eventually your filter might break/get scratched or simply need replacement. Luckily the replacement filters [visible blocking, UV passing - ZWB2 20mm round] sell for a very reasonable price ($1.50 to $10 - all the same, just different pricing).
The Convoy is the only light you will ever need to prospect for minerals in the field or at shows. The intense spot reveals fluorescence even in daytime light. But at home it's really not suitable for large home display cabinets - the small "spot" works against us, illuminating only a small area. For home displays an LED light configured as a floodlight is best. Check out this blog post for a neat 365nm LW display system perfect for small to extra large displays.
Batteries - the lights do not ship with a battery. It uses a standard 18650 lithium battery available almost anywhere fine batteries are sold. I use batteryspace.com almost exclusively as my battery supplier. I would choose a "protected" battery (prevents you from over-discharging the battery). Of course you will also need a charger. These batteries are used in almost all the major white-light LED flashlights now on the market - nothing terribly special. (links below)
A couple of large "mega-threads" developed in the FMS Fluorescent Mineral Discussion Group, with contributions by many folks. You can view them here: https://www.facebook.com/groups/fluorescentminerals/permalink/10154991367833571/ and https://www.facebook.com/groups/fluorescentminerals/permalink/10154964299628571/
A Brief Review of this Light's Performance and Technical Details

So why am I so excited about this light? This is a picture of a piece of Greenland sodalite taken with the room lights on (quite bright). The pen shows how far away the flashlight was from the specimen. Even at this distance the fluorescence was so bright that I had to cut back the exposure time on the camera. Light up your rocks in the daytime!

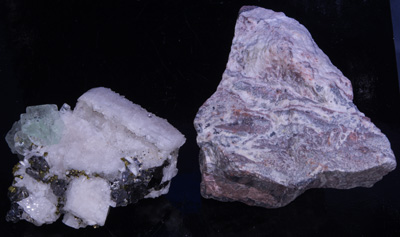
But what about other rocks? This pic shows a bunch of specimens not normally displayed under longwave. Clockwise from the lower left:
Calcite Crystals - under a fluorescent LW bulb these hardly light up
Calcite from Langban, Sweden - have never seen this react to LW before
Puttapa - yellow response normally under MW, not LW
Franklin willemite/calcite (red/green) - remember, this pic is LW only using this flashlight
Tugtupite from Greenland - note the white fluorescence, not even sure what that is
Hauyne and Gonnardite from Afghanistan - minerals from this area love LW
Fluorite - the big blue crystal in the middle is from Elmwood TN, famous for non-fluorescent fluorite
WHY DO UV FLASHLIGHTS NEED FILTERS? The Convoy light puts out a pure 365nm of UV with a little visible light leakage. The Nichia LED is known to put out the least amount of visible light of all the higher quality LEDs, but it still puts out plenty of visible light (towards the blue/purple end of the spectrum) Some minerals will fluoresce under this ordinary visible blue (or violet) light (see Nature's Rainbows blog on blue light fluorescence: https://www.naturesrainbows.com/single-post/2016/03/05/Blue-Light-Fluorescence-Who-needs-UV-anyway). Greenland sodalite is famous for fluorescence under an ordinary blue Xmas tree bulb. (Note: the LED used in this flashlight is spec'd at 365nm, +/- 3nm. Operating temperature and battery charge can further affect the output. Best results are obtained with a fully charged battery and a cool flashlight. As the flashlight warms from operation the wavelength can shift up to ~370nm).
I took a piece of Greenland sodalite and a flashlight without the ZWB2 UV bandpass filter installed and I stuck a UV blocking filter (Tiffen for a camera) in the path to block all the UVA coming out. This means that no UV got to the rock but the visible light from the flashlight did. This blue/violet light was plenty strong to cause it to fluoresce (1st pic). The sodalite glowed strongly, and areas that were non-fluorescent white matrix showed a strong blue cast caused by this visible light. Also, note how the fluorescent color of the sodalite is pink instead of the normal orange - caused by the blue light mixing with the orange to create pink.
Then I took a flashlight with a ZWB2 UV pass/visible blocking filter installed and took the pic again with same UV blocking filter in the path (remember, no UV can get to the specimen), same camera settings and RAW exposure settings - 2nd picture, huge difference. A little visible blue light still gets out (filters are not perfect) and caused a very minor fluorescence. But note that there is no overwhelming false blue color. If you have a junky flashlight laying around and a UV blocking camera filter (or a piece of OP3) you can try this yourself. These LEDs generate a lot of visible light, and the cheap ones are the worst. It is essential to have a UV pass filter on your flashlight.


UV Bandpass Filter - what do our rocks look like with and without the filter?
I photographed a set of two rocks using the Convoy 365nm light, shown below under white light (left) and this flashlight (right). The blue/orange rock is a piece of fluorite on calcite from Morocco. The yellow rock is willemite from the Puttapa Zinc Mine in Australia. Under UV I took two pictures: one with a filter on the flashlight and one without the filter on the flashlight. Both UV pictures were taken using the exact same camera settings and holding the flashlight the same distance from the specimens.


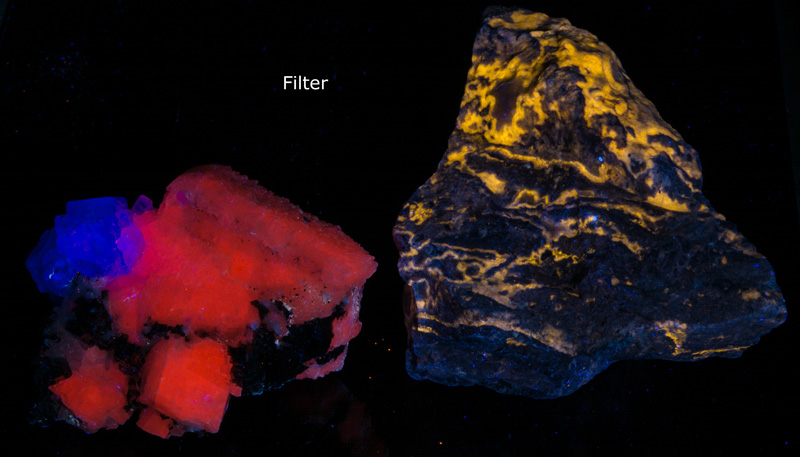

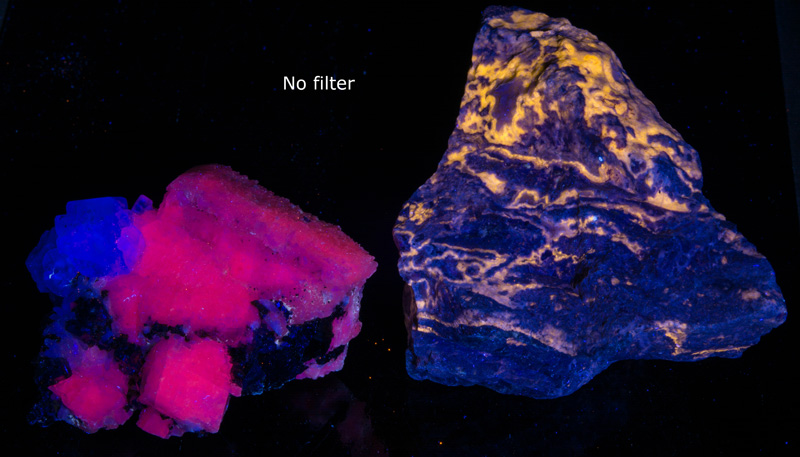
Even with a filter the flashlight still emits visible light. The first pic below shows the light coming out of a flashlight with a ZWB2 filter installed. The second pic shows the same flashlight with UV blocking goggles in front on the output. These goggles block all UV below 400nm. Notice that the purple light is gone completely. The blue haze seen is caused by the extremely intense UV from the flashlight causing the goggles to fluoresce. But there is no visible light seen through the goggles. This means that the purple light seen in the first pic is all UV - 380nm to 400nm - and our eyes can see UV in this range.
The 3rd pic was taken with a ZWB1 filter installed instead of the ZWB2 filter. The transmission specs for the ZWB1 show that it has a sharper cutoff at 380nm (but also passes 35% less UVA than ZWB2). The result is much less visible purple light and should be an excellent choice for photography @365nm.


There are many choices for filters. The graph below shows their relative transmission rates when installed in this flashlight. The clear lens supplied with the flashlight is included, showing that even it blocks ~8% of the UV output. ZWB1 is best at blocking visible light. Wood's Glass has the best UV transmission (but also the worst filtering of visible).

How to clean and replace a filter
Filters may break or get dirty over time. The UVA from the LED is intense and can burn organics onto the inside surface of the filter. The filters are really easy to remove and install a new one (or clean with alcohol) There are many places online to order a replacement filter. But you will have to take your flashlight apart to install one. So here's some pics showing the light disassembled, and some hints on one slightly tricky area.
First the components - Below is a flashlight disassembled. It's real easy to just unscrew the head. But there's a trick to getting the LED "pill" assembly out, shown in the 2nd pic.


Once you unscrew the head look inside. You will see the pill which screws into the head as the view below. To unscrew this pill, just take a pair of fine-tipped needle nose pliers, tweezers, or whatever other tool you can think of and stick the ends into the two slots (arrows). Turn counter-clockwise and the pill will come right out. Tap gently and the reflector and filter will fall out (be careful not to damage the LED or set the pill facedown on it). If somehow you got your hands on an unfiltered light just throw the clear lens glass away; it's useless IMHO! Stick your new replacement (or cleaned) ZWB2 filter in the head, drop the reflector back in (make sure both sit flat in the front of the head) and screw the pill back in - tighten securely so that heatsink functions properly (see tips on heating below first).
This FB thread talks about removing the "pill" if you're having trouble: https://www.facebook.com/groups/fluorescentminerals/permalink/10157062365848571/

Beam spread - This flashlight puts out a powerful spot with a very respectable throw. You can light things up from quite a distance. But fluorescent mineral collectors are usually more interested in closeup use. This has a slight disadvantage (or maybe an advantage depending on how you will be using it). Up close, the spot is small and intensely lights up a 2" area; lighting up a large rock completely may require you to hold the flashlight a couple of feet away. But the intense, small spot will almost make a piece of coal glow (great for shows).
Beam shots below show the spread. The flashlight on the left has the stock reflector. I modified one flashlight with a wider angle reflector, shown on the right. I have some more reflectors coming in to test. If useful I will expand this section.
The next set of pics show the spot diameter at varying distances. Field of view is appx 8", illuminating a white sheet of paper.


Heat issues - I have seen one report claiming heat problems. And manufacturers are installing even higher power LEDs (with little gain in performance) in this little flashlight. UV LEDs are very sensitive to heat. I'm not sure one complaint means there is a problem but there are a couple of things you can do to make sure your flashlight is optimized for heat dissipation:
Make sure that the brass pill is screwed tightly onto the front (head). This insures that the LED is pressed against the brass heatsink
Get a tube of silicon compound (thermal paste) and put a very thin coat on the threads of the brass heatsink before screwing it into the head to maximize heat transfer to the body of the flashlight.
I use mine intermittently - 5 or 10 minutes at a time.
I ran some heat tests and don't see a problem. With proper care and handling this light should last for years. I would not put it in your pocket while it's on - it needs airflow to cool. I would turn it off when it gets hot and let it cool to maintain maximum power and life. The graph below shows how the UVA output decreases as the LED heats. I measured the body of the flashlight externally; there is no easy way to measure the LED directly. The LED may be safely operated at up to 60C when measured directly at the heatsink - I'm not sure how efficient the heat transfer is from the heatsink to the flashlight body. But the power output does not drop significantly after one hour, so my bet is there in no problem.
More on heat and wattage here: https://www.naturesrainbows.com/single-post/2015/05/01/Convoy-S2-365nm-False-Power-Claims---It-Aint-5-Watts-4-35-or-even-3


Batteries - The Convoy S2 uses a single 18650 lithium battery. There are many types and brands, some better than others. They are sold by Walmart, online battery shops, Vape shops, and many other places. They are used in all the higher power white light LED flashlights. Battery choice up to you; this blog won't attempt to get into batteries, technology, etc. Buy a good one, and don't forget the charger.
Note: Batteries ordered via mail - they will most likely arrived almost fully discharged (by law that's how lithium batteries are to be shipped). You must charge them before use. They will have a little charge to them, but not enough to drive this light at full brightness. Not sure about batteries you purchase at a store....
One thing to be aware of no matter which brand battery you select is that they all discharge - some faster than others. The LED used in this light is very sensitive to voltage. If the voltage dips below a certain level the LED will dim. Always use a freshly charged battery. The light consumes about 700ma so theoretically if you have a 2100mah battery it would last 3 hours. Problem is that the battery voltage slowly drops over this 3 hour period and somewhere in between it will drop lower than the required voltage for the LED. Carry a couple of fresh batteries and replace them after an hour of use or so. Your light will then pump out maximum UV all night long.

Where to buy
Note: one year later. The Convoy has taken the fluorescent world by storm. Many USA sellers are currently offering packages with filter, battery, and charger on Ebay or on their websites (marked up considerably but neat that you can order a complete package domestically. Simply Google "convoy 365nm flashlight for fluorescent minerals" and you'll find what you want, likely already assembled and local - get it in a couple of days.
The Convoy S2+ is available online many places, with many different prices. The links below are places where you can buy it, that I am aware of as of 2016, and may change. Best bet is to Google it yourself and shop around. Surely it will show up on Ebay eventually, as well as Amazon. BE very sure that you are ordering an original Convoy S2+ 365nm. Surely imitations will show up claiming the same performance at a cheaper price, even claiming the same name (rampant in China I'm afraid). This light is already so cheap - it can't be made cheaper (today).
GearBest - http://www.gearbest.com/led-flashlights/pp_277704.html - ~$22.00
BangGood - http://www.banggood.com/Convoy-S2-Nichia-365nm-UV-LED-1Mode-OP-Reflector-Flashlight-p-1024097.html?rmmds=search - ~$28.00
AliExpress - https://www.aliexpress.com/store/product/S2-black-UV-365nm-flashlight-nichia-365UV-in-side/330416_32515105965.html - ~ $26.00
Google to find other suppliers. Amazon has one listed currently but it shows out of stock.
ZWB2 UV Bandpass Replacement Filter - If you break your UV bandpass filter, or want to replace the lens, you'll need a 20.5mm ZWB2 filter (20mm OK too). Lots of places sell these, at widely varying prices. Check on Ebay (search ZWB2) or try those listed below. Stock seems to come and go - worse, the links change all the time. Just google ZWB2 - hundreds of listings online.
BangGood - http://www.banggood.com/365nm-UV-Flashlight-Visible-Filter-Lens-1pcs-p-1015970.html?rmmds=search - $3.00
AliExpress - https://www.aliexpress.com/store/product/ZWB2-filter-for-365nm-light/330416_32649282235.html?spm=2114.12010608.0.0.IsIpoV - $4.00
ShopIMS - http://www.shopims.com/electronics/led-light/led-flashlights/1pc-zwb2-flashlight-uv-filter-20mm-x-2mm - $2.00
Battery - This is my preferred battery but there are many choices. The light accepts both protected and unprotected batteries. All will probably be acceptable - most reasonably powerful white-light LED flashlights use these types of batteries. http://www.batteryspace.com/li-ion-18650-rechargeable-cell-3-7v-2600mah-9-62wh-5-0a-rate-button-top-pcb-protected---oem-from-japan-korea--un-38-3-passed.aspx
Another recommendation is a somewhat more powerful 18650 Sanyo NCR18650GA 3500mAh High Discharge Flat Top - google to find the latest price and supplier.
Charger - Lots of choices, this is a good one: http://www.batteryspace.com/nitecore-d4-digicharger-4-bay-universal-battery-charger-for-li-ion-imr-lifepo4-and-ni-mh-ni-cd-batteries---ce-listed.aspx - It does 4 at once. There are cheaper single bank and dual bank chargers too - check Ebay. Other choices include Nitecore i2 $15 (or D2 if you like the screen) or if you only plan to get one or two batteries something like the XTAR MC1 Plus $8
Note: There are broad ranging claims that a piece of glass installed in a flashlight is protected by a patent - even the original clear lens supplied with all flashlights falls under the sweeping claims made by this individual. I will not offer my opinion on the validity of this claim. Do your own research. The patent holder publicly states that it is permissible for individuals to install a filter for their own use.